


GOLD 1H CHART ROUTE MAP UPDATE & TRADING PLAN FOR THE WEEK
-
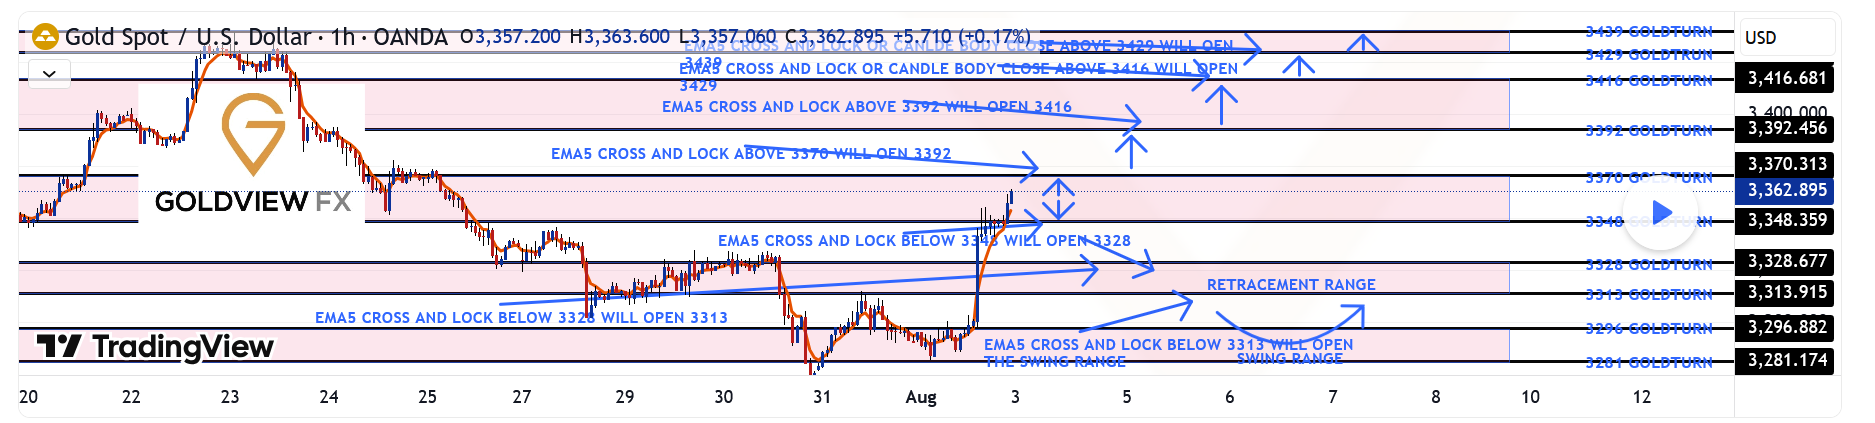
Hey Everyone,Please see our updated 1h chart levels and targets for the coming week.
We are seeing price play between two weighted levels with a gap above at 3370 and a gap below at 3348. We will need to see ema5 cross and lock on either weighted level to determine the next range.
We will see levels tested side by side until one of the weighted levels break and lock to confirm direction for the next range.
We will keep the above in mind when taking buys from dips. Our updated levels and weighted levels will allow us to track the movement down and then catch bounces up.
We will continue to buy dips using our support levels taking 20 to 40 pips. As stated before each of our level structures give 20 to 40 pip bounces, which is enough for a nice entry and exit. If you back test the levels we shared every week for the past 24 months, you can see how effectively they were used to trade with or against short/mid term swings and trends.
The swing range give bigger bounces then our weighted levels that's the difference between weighted levels and swing ranges.
BULLISH TARGET
3370EMA5 CROSS AND LOCK ABOVE 3370 WILL OPEN THE FOLLOWING BULLISH TARGETS
3392EMA5 CROSS AND LOCK ABOVE 3392 WILL OPEN THE FOLLOWING BULLISH TARGET
3416EMA5 CROSS AND LOCK ABOVE 3416 WILL OPEN THE FOLLOWING BULLISH TARGET
3429EMA5 CROSS AND LOCK ABOVE 3429 WILL OPEN THE FOLLOWING BULLISH TARGET
3439BEARISH TARGETS
3348EMA5 CROSS AND LOCK BELOW 3348 WILL OPEN THE FOLLOWING BEARISH TARGET
3328EMA5 CROSS AND LOCK BELOW 3328 WILL OPEN THE FOLLOWING BEARISH TARGET
3313EMA5 CROSS AND LOCK BELOW 3313 WILL OPEN THE SWING RANGE
3296
3281As always, we will keep you all updated with regular updates throughout the week and how we manage the active ideas and setups. Thank you all for your likes, comments and follows, we really appreciate it!
-
Appreciate the clarity in this 1H chart breakdown — it's rare to see such a clean and actionable route map. The step-by-step levels with clear invalidation zones make this plan feel well thought out rather than speculative.
What really stood out is the balanced tone — not overly bullish or bearish, just structured around probability and market behavior. That’s exactly the mindset needed for consistent gains, especially in volatile assets like gold.
Looking forward to seeing how this plays out through the week. Definitely keeping an eye on the levels you’ve marked. Thanks for sharing and educating along the way — posts like this are gold in themselves! 🪙
🪙
-
Really solid technical roadmap. The precision of entry zones and the caution around key resistance levels show real discipline. It’s refreshing to see someone plan with structure instead of chasing impulses. Following this setup closely throughout the week — let’s see how gold respects those zones!

